To the uninitiated sous vide may seem like an esoteric and unnecessarily complicated way to cook food. One might feel that cooking sous vide is better left to the professionals, but honestly, it’s almost microwave-dinner-easy: You set the temperature for your bath, put your food in a bag and pull it out when it’s done.
The beauty of cooking sous vide is that the temperature of your water bath is set to the final, desired temperature of your food. Cooking then becomes a process of waiting until the food reaches equilibrium (the same temperature) of the bath. This means it is impossible to over-cook. The method lends itself perfectly to applications like cooking a steak to a perfect medium-rare 130°F (55°C). The steak will be cooked evenly, from edge-to-edge, avoiding the overcooked outer areas that are typical of other more traditional methods.
Sous Vide 101
The term sous vide, roughly translated from French, means “under vacuum”. This describes the process of cooking food in a bag which has had the air removed, typically with a vacuum sealer. The reference of “cooking sous vide” has evolved to represent food cooked in a water bath, whether sealed in a vacuum bag, or not (like eggs cooked in their shell).
Special Applications:
There are things that can be accomplished sous vide that are not possible by any other method. For example, tough cuts like short ribs are traditionally cooked by braising with a bit of liquid at a low(er) heat for an extended period of time; allowing the breakdown of connective tissues and tenderizing of meat. This is typically done at temperatures between 250°–300°F (121°–149°C). This makes it impossible to cook short ribs to a medium-rare temperature, as doing so would not allow enough time to tenderize the meat. But with sous vide, we are able to cook at a precise temperature like 130°F (55°C) for an even longer period (typically 2 or 3 days) to achieve a short rib that is perfectly tender and beautifully medium rare. Check out my method for cooking pâté en sous vide.
Everyday Applications:
The applications for cooking sous vide ar far-reaching and not limited to esoteric or complex preparations. Perfectly poached eggs, al dente vegetables, steaks cooked to an exact medium-rare, incredibly moist pork tenderloin, fermenting yogurt or making cheese, candy and pastry applications, keeping cooked foods warm before serving, or even heating baby bottles. Really, the possibilities are endless.
The Tools for Cooking Sous Vide
Sous vide cooking requires an immersion circulator to heat water, a pot or container to hold water, and a zip-lock bag, vacuum sealed bag, or an air-tight container like a mason jar to contain the food being cooked.

Polyscience Model: 7306
Immersion Circulators
An immersion circulator is the appliance used to cook sous vide. The circulator heats and holds water at a precise temperature, typically within 0.1°C.
In the past couple years, lower-cost immersion circulators have come to market. Previously, to cook sous vide required a significant investment in equipment. A typical immersion circulator, like the Polyscience 7306, would have cost you $1,200-$1,500—a price far too high for most home cooks. Thankfully, that’s no longer the case. There are multiple circulators, like the Anova, Sansaire, and Nomiku, all available in the $200 range; a price less than a quality blender.
Not only are these new circulators cheaper, they are often just as powerful and becoming significantly more advanced. For example, Nomiku recently announced the next generation of their circulator, the Nomiku 2, which boasts a 1,200 watt heater, capable of keeping 30L of water within 0.01°C, and able to operate in 1.5″ of water. Doing so with WiFi connectivity, apps for iOS and Android and an open source API for the development inclined. And all this at a size that’s less than half the Polyscience models.
My choice for an immersion circulator in the sub-$200 price range is the Nomiku. I own all previously mentioned circulators and prefer the Nomiku. It’s by far the smallest of the bunch, yet boasts the same power and accuracy as the others. That, plus other features, like the ceramic heating element and power-disruption indicator, make it the one I reach for most often. I’ve had the opportunity to work with the small team over at Nomiku and they couldn’t be more supportive. They recently launched a Kickstarter campaign for the next generation of their circulator, the Nomiku 2. I had an opportunity to see an early beta version and it looks thoroughly impressive.
UPDATE: Nomiku has graciously offered readers of Our Daily Brine a 20% discount (for a price of $179) on the Classic Nomiku. To claim the discount simply enter the discount code “OURDAILYNOM” in your cart and click Check Out.
Water Baths
The circulators mentioned above will work well in any heat-proof container. You simply clip it on, make sure it’s submerged in the proper amount of water, and turn it on. Any container will work, but some are better suited than others.

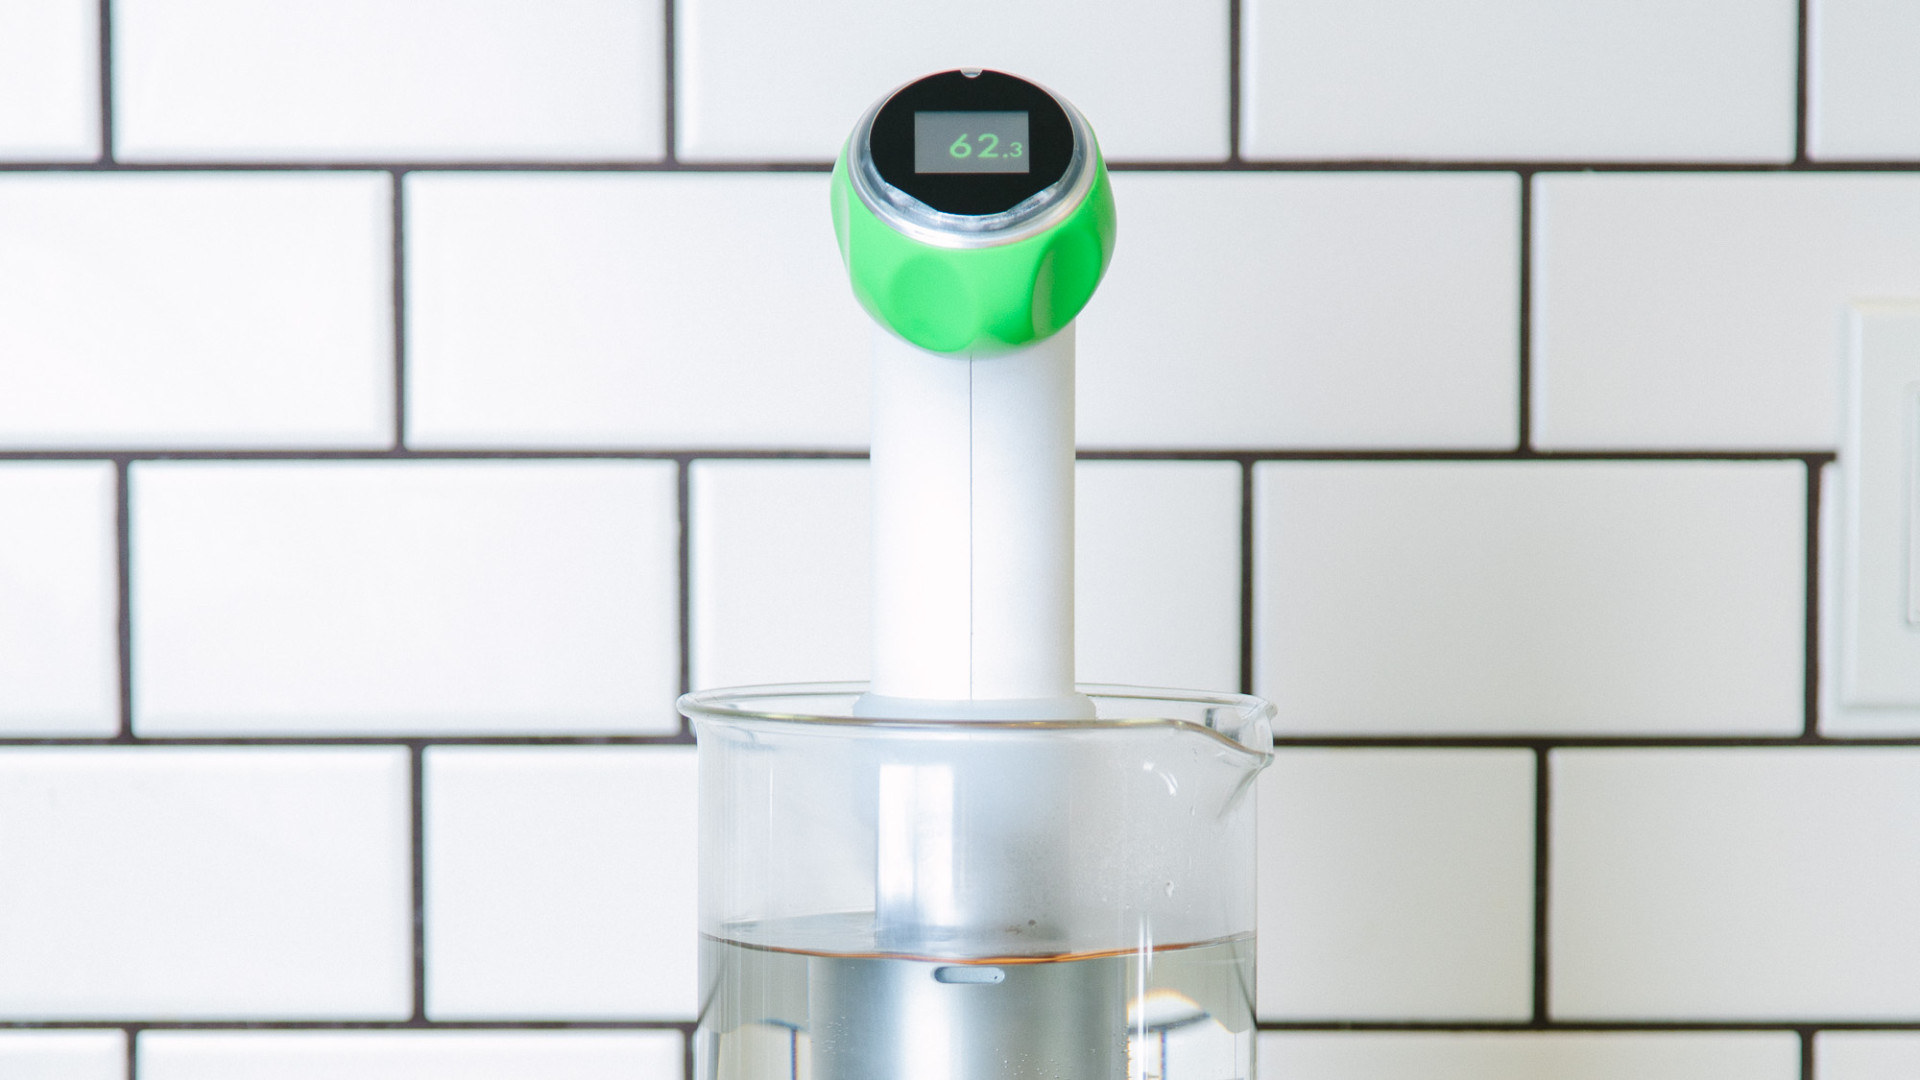
Nomiku in beaker water bath
Household Pots:
If you cook, it’s likely you own a stock pot of some sort. These often make fine water baths, so long as your circulator fits. I often use a beaker (pictured to right) for small tasks, as my kitchen is filled with them and they make perfect prep/cooking containers.
Polycarbonate Containers:
Polycarbonate food containers like the 12qt. Cambro (pictured in photo at top) are typically used for sous vide cooking because of their versatility and ubiquity in commercial kitchens. The advantage of a larger container with more surface area is that the water level (displacement) varies less when items are added and removed. Circulators have a minimum and maximum water level line. Adding/removing large items will displace an equal amount of water, necessitating a dance of adding and removing water to stay within the min/max levels. This is more dramatic in smaller pot-like vessels, and less so in larger containers.
As we know, water evaporates. Typically evaporation is not an issue when cooking sous vide, unless cooking for an extended period and/or the temperature is high. This can be minimized by using a container with a lid. Polycarbonate containers typically have matching lids that are easy to cut to fit your circulator.
Insulated Containers:
Insulated containers put less strain on your circulator and thus require less energy to maintain consistent temperatures. Moreover, insulated containers work well for extended cook times. The Nomiku Cooler Hack is an excellent demonstration of an insulated cooler with a lid cut to the shape of your circulator.
Vacuum Sealers

Carrots in edge sealer vacuum bag (note the waffle texture of bag)
The last piece of the puzzle. Although it’s not entirely necessary, if you are going to invest in equipment for cooking sous vide, you should consider purchasing a vacuum sealer. Vacuum sealers come in two basic forms: edge sealers and chamber sealers.
Edge Sealers:
Edge sealers work by sucking air out from an unsealed edge of the bag and sealing the bag once the air is removed. Edge sealers require special vacuum bags with one smooth side and the other textured. This allows the air to pass by the food on the textured side as it is extracted. Edge sealers are often sufficient for any type of home use and are easily stored when not in use.
Pros: Edge sealers are inexpensive (+/- $100) and will be sufficient for most all home applications.
Cons: Less vacuum power resulting in weaker vacuum. Sealing with liquids requires freezing liquid first.
FoodSaver established the category of home vacuum sealers and continue to offer a solid product. I use mine daily at home. The FoodSaver V244 ($70) is a well performing, bare-bones vacuum sealer and will get the job done. The FoodSaver 4840 ($182) is a more feature-rich sealer with some added benefits. Either are great options, depending upon your budget. VacMaster makes the PRO305 Vacuum Sealer ($299) which is one of the best edge sealers with significantly more power and durability than the FoodSaver models. It’s an excellent option if you’re considering top-of-the-line edge sealers.
FoodSaver bags are akin to printer ink. That is, all the money is made on the bags, not the appliance. As such, FoodSaver brand bags are way overpriced. I’d recommend avoiding them and purchasing a generic bag. These bags work perfectly with edge sealers and are ¼ the cost.
Chamber Sealers:
Chamber sealers work by removing all the air from a chamber, and not just the bag. This allows for liquids to be sealed in the bag, as the vacuum is inside and outside of the bag. Chamber sealers are often much more powerful and provide varied levels of vacuum. Chamber sealers allow for many other interesting and useful applications, like removing air bubbles from a mixture, compressing and infusing liquids with different foods, and more. Most all professional kitchens cooking sous vide use chamber sealers.
Pros: More powerful vacuum with multiple vacuum levels. Ability to seal liquids. Many more applications.
Cons: Significantly more costly (typically $500+). Larger and bulky, requiring dedicated counter space.
The VacMaster VP112 ($590) is a quality chamber sealer and one of the most affordable, smaller units. It would work well for home use.
Alternate Containers
Food does not have to be vacuum sealed. Ziplock bags can be used by submerging to the edge in water and sealing (referred to as the displacement method). Mason jars also make an excellent vessel for cooking, especially when the item being cooked is a liquid. Eggs can be cooked in their shell, and packaged items can occasionally be cooked right in the package/tin, provided the label is removed prior (like heating or cooking tinned goods).
Browning Food Cooked Sous Vide
Most proteins, like beef, chicken, or lamb, benefit from a healthy dose of the Maillard reaction (often confused with or referred to as caramelization). The desirable browning produced by the Maillard reaction happens at temperatures around 284°–329°F (140°–165°C); well above the boiling point and cooking temperatures of sous vide. This requires that we sear (and/or pre-sear) after cooking sous vide. There are several methods for searing.
Pan Searing:
Pan searing is typical, though prone to overcooking when not done carefully. Pan searing requires a super-hot pan (cast iron are best) and a quick sear, being careful not to overcook the protein. Contrary to popular belief—which insists you not touch your food while it’s searing—flipping the protein every 15 seconds will allow a good sear while preventing overcooking of the interior.
Torch Searing:
Using a high-powered torch is a typical way to sear food cooked sous vide, and due to the significantly hotter heat, cooks quicker, avoiding the over-cooking typical with pan-searing. The downfall of torch searing is the potential for “torch taste” caused from burning bits of the protein due to not moving the torch quickly enough.
Deep Frying:
When time permits, my favorite method is deep-frying. It’s easy to get a quick, golden brown crust without overcooking the interior or burning bits of the exterior. It allows you to sear all sides at once and maintain that edge-to-edge perfection that’s a hallmark of sous vide cooking. Deep frying is significantly easier and cleaner when you have a dedicated fryer. Deep frying in a pot on a stove is certainly just as easy, but always seems to yield a mess.
Searing can certainly be accomplished by other methods, like broiling under a commercial salamander, grilling, flat-top, baking steels, etc. Anything that imparts high-heat quickly.
Pan Searing — A good, old-fashion cast iron skillet is perfect for pan searing. If you want to upgrade your skillet game, the FINEX 12″ cast iron skillet is tops.
Torch Searing — The Bernzomatic TS8000BT is the industry standard. The Searzall is a recent introduction, but my results have varied. As for gas, there seems to be some disagreement as to which is best. Popular opinion says that a MAPP gas is better suited than propane and avoids torch taste; other sources say gas is not a factor in torch taste, and that method of searing is key.
Deep Frying — A deep, high-sided pot that retains heat well (like a dutch oven) is really all you need, but a dedicated fryer is excellent. The Waring DF55 Mini-fryer is what I use. It’s excellent, small and cheap; perfect for frying a couple of steaks at a time, without taking up a huge amount of cabinet space.
Additional Resources on Cooking Sous Vide
With this post I only scratch the surface of cooking sous vide. The books and websites that follow are a few excellent resources on the topic. They are listed according to comprehensiveness; from introductory to exhaustive authority.
- Nomiku Sous Vide Primer (Free, PDF) — A handy reference that’s shipped with the Nomiku. It covers the basic of sous vide, safety and preparation, as well as a few introductory recipes.
- Polyscience Time/Temp Reference (Free, JPEG) — A handy reference for time and temperatures for cooking common proteins.
- Polyscience Sous Vide Toolbox ($4.99, Apple iOS) — A horribly designed app with extremely useful information. It will take a bit to figure out, but the app will calculate time and temps for several different foods based on all sorts of input criteria, like shape, thickness, starting temp, and even your brand of circulator.
- Modernist Cuisine at Home ($105) — A home-cook—and pocketbook—friendly(er) version of Modernist Cuisine. It covers everything the average cook would need to know about cooking sous vide. This is also an excellent general reference for cooking and touches on some of the “modernist” techniques covered in Modernist Cuisine.
- Modernist Cuisine at Home eBook/App ($79.99, Apple iOS) — Building upon the content of the printed version, this is an excellent resource. Excellent on both the iPhone and iPad. $80 may seem like a hefty price for an eBook, but this is so much more. By far one of the best digital cookbooks available. I’d highly recommend.
- ChefSteps (Free + Paid Courses, Website) — An online “school” for cooking. ChefSteps is easily one of the better websites and resources for cooking available online. They offer multiple paid course on varied topics, as well a tremendous amount of free content, including excellent videos. Founded by a few of the key players behind Modernist Cuisine. A lot of the recipes and course deal in sous vide cooking; some specifically.
- eGullet Sous Vide Index (Free, Website) — An exhaustive resources on all things sous vide. In 2005 this is where the idea of the Modernist Cuisine books started, with eGullet member Nathan Myhrvold. It’s fascinating to see this idea turn into the triumph that is Modernist Cuisine. Answers are here, but they take a bit of digging, due to the format.
- Cooking Issues (Sous Vide Primer) (Free, Website) — When you’re really ready to really dive deep, the folks at Cooking Issues are some of the most knowledgeable in the world. They offer several (free) excellent primers, including one on cooking sous vide.
- Under Pressure: Cooking Sous Vide ($43.28) — One of the first, and still one of the best, books on cooking sous vide. Thomas Keller and Harold McGee. Do you really need to say any more than that?
- Modernist Cuisine ($470) — This tome is easily the most exhaust reference on the topic of cooking sous vide. Moreover it’s quite possibly the most significant book on food and cooking of all time. At $470 it’s not an insignificant investment. But if you are serious about cooking, it’s likely the best $470 you will ever spend. These books continue to blow my mind.


31 Comments
-
Epic post!
-
Author
Thanks, Mr. Lee.
-
-
Most butcher shops (like my own) have a vac sealer, and should be happy to seal whatever foods needed
-
Peter, that’s an excellent point. I’m sure my butcher would do the same. Thanks for mentioning that.
-
-
Great post, however there is no mention of thermometers?
-
Thanks, Andy. Two reasons: (1) The goal was to address essentials to cooking sous vide. Immersion circulators are themselves thermometers, thus an additional thermometer is not strictly necessary. (2) I’m planning another Kitchen Essentials post specifically for thermometers.
In the top photo you can see that I do utilize a thermocouple probe occasionally to monitor core temp. If you’re interested in that, I have written about it briefly in Pâté de Campagne en Sous Vide (scroll down to “Monitoring Core Temp”). Hope that’s helpful.
-
-
Kyle, I have a very accurate .01 Gram scale that I use occasionally, but the issue I am having is the actual conversion of ingredients from cup, tablespoons and teaspoons. What exactly should each of those really weigh and does it vary by the density of the raw ingredient that you are weighing. For instance would there be a difference between tomatoes and uncooked rice, or flour and cooked ground beef. So I am ready to make the metric jump, but need to know how to convert the more conventional measures that are already in soooo many of the different recipes I use. Thanks for the help and your thoughts and comments on this somewhat perplexing kitchen dilemma.
Wheelchair Bob
-
Bob — I answered your question here.
-
-
I have been using an Anova One circulator to cook a variety of foods in zip lock bags. I have used recipes from a variety of sources (including your web site). In general I have been disappointed with the results as everything I cook tends to be both bland and dry compared to conventional roasting or grilling methods. I have also noticed that most foods cook in their internal juices which seep out into the bag during sous vide cooking (probably the cause of the dryness and blandness).
I’ve tried to correct these problems by varying the cooking times, by pre-searing and/or post-searing, by adding oil to the bag before cooking and by not adding oil to the bag before cooking, by adding seasonings before and after cooking, etc. but nothing helps.
What can I do to correct these problems?
-
Jerry, I’d be happy to help you diagnose some of your issues with cooking sous vide. You’ve got a lot going on here though. How about present a single issue; understanding your desired outcome, what method your used, and what went wrong. From there I can help.
-
-
Thanks very much Kyle. I appreciate your help. I’ve cooked a lot of foods with my Anova. But the results, as i mentioned, are disappointing. As an example I’ll focus on New York Strip steaks. I’ve cooked numerous steak at 130 Fahrenheit in air evacuated zip lock bags for between 45 minutes and two hours. As the cooking time increases, tenderness does increase but so does blandness and dryness. The longer the steaks cook, the more liquid (juices) seep out of the steak and into the bag. So the steaks cook in their own juice or in beef broth, which is what it tastes like. Although the steak is medium rare throughout, its dry – not juicy as it is in conventional grilling and roasting. To fix this I’ve tried pre-searing, post searing and sometimes both. Sometimes i add salt and pepper before cooking and sometimes after. Sometimes I add oil to the bag before cooking and sometimes I don’t. Nothing affects the blandness and dryness. What am I doing wrong? I’ve run into similar problems with rack of lamb, chicken breasts, whole chickens and salmon.
-
Jerry. Hmm. It really sounds like you’re doing everything right. Dryness is typically a factor of high heat. The higher the heat the more it squeezes the protein cells and they inturn exude liquid (a gross simplification). Have you confirmed that the temp on your circulator is correct? A vacuum-sealed bag is always a bit better, but I’ve never had “bad” results using ziplock either. You do want to be sure to get all of the air out. I’ve cooked hundreds of steaks sous vide. And I know many, many others who do the same. The result is never dry. You do need to sear pre- and/or post-cook. I typically cook steak in butter, then dry and drop in a deep fryer after the bath. Salting and pepper should be done post sear and prior to serving. There will always be some juice in the bag, but it should be a crazy amount. I’ve done 72 hour cooks with excellent results. I honestly don’t know what you’re doing wrong. Maybe try posting photos and steps over at the sous vide subreddit and see if they can help you there? Sorry. Wish I could be of more help.
-
-
Thanks for the follow up. I’ll look into calibration and the reddit site
-
Hi, Kyle-
First off, great post and site. You’re doing well thought-out, practical, and insightful work. And it is much appreciated.
Now that some time has passed since the original post, I was hoping you might be able to elucidate on your overall experience with the Searzall. Its reception seems to be mixed and I am curious about your take.
Thank you,
Matt
-
Thanks, Matt. I appreciate it. As for the Searzall, I’m still asking myself the same question. Honestly, it’s not the tool I expected—or at least desired. I’ve found application for it, but in many of the uses it was purported, I’ve not had success. That seems to be the general sentiment from those I know as well. “Good. But not what I expected.” I think the verdict is still out for me. Maybe it’s an issue of technique as well… just not sure yet.
-
-
Hi, Kyle.
Great article, terrific detail, well written, and especially love the additional resources and the Coleman Cooler hack link. Looking forward to sharing this article with friends who convinced me to buy a Sansaire, which I really should use more often than I do.
All the best… Mora
-
Thanks, Mora. Glad that you found it beneficial.
-
-
I didn’t even know this type of cooking existed!
-
Indeed it does. And it’s much easier than it may appear.
-
-
I’m not so sure that this is the healthiest method for cooking. Plastics give off all sorts of chemicals, what assurance have you that heat sealed plastic bags are not infusing the food with unwanted chemicals?
-
Kathleen, There have been many studies proving the safety of food-grade plastics. Unless you farm all of your food yourself, I can guarantee you that your food has been stored/cooked/heated in plastic at some point. If you are scared of plastic, by all means, avoid it.
-
-
If your trying to sell me on the idea, then suggesting I’m scared is going about it in the wrong way. Not a good way to gain more customers for your concept. I was merely making an inquiry and your role is to merely to provide a response in a non condescending manner.
-
Kathleen,
I don’t mean to be condescending, but you are a ding dong. -
Kyle, if water seeps into my mason jar when making sous vide yogurt, is the yogurt contaminated and should not be consumed? Apparently, I did not screw the lids in tight enough on a few mason jars when I made my last batch and concerned about undesirable bacteria growth. Hope to hear back from you, thanks in advance!
-
Assuming you had fresh water, and the circulator hadn’t been exposed to anything like raw chicken in water recently, you’re probably fine. It would be no different than drinking warm water from the tap. You could scrape off a little from the top of the yogurt for an added layer of safety. It’s impossible to say anything with certainty without knowing the exact details, but that said, it wouldn’t be something that bothered me.
-
-
Thanks for shrgina. Always good to find a real expert.
-
I do not know whether it’s just me or if perhaps everybody else encountering issues with your site.
It appears like some of the text within your content are running off the
screen. Can someone else please comment and let me know if this is
happening to them too? This could be a issue with my web browser because I’ve had this happen before.
Many thanks -
You can overcook sous vide, quite disastrously. Tender cuts of meat are especially easy to overcook. They turn into this baby-food like paste, at surprisingly modest temperatures, and surprisingly quickly. For example I have reduced high quality legs of lamb and venison to paste by cooking 8 hours at 59C. I have reduced hamburger to paste as quickly as 2.5 hours also at 59C. These are all within the range of recommended cooking methods in many sources, and maybe work fine if you don’t have such high quality tender meat as I had on those occasions.
For the beginner, sous vide produces the greatest advantage for tough cuts of meat, where long slow cooking turns into something utterly delicious that is hard to create in the oven. When you are cooking for 2 to 3 days, 12 hours more or less doesn’t make a large difference.
-
Thank you so much for all this great information!
-
An excellent post. Thanks Kyle.
-
Your welcome.
-